
Snapping to Data
When digitizing field data, it can be useful to snap string vertices to known landmarks, or to abut one edge of a feature to another.
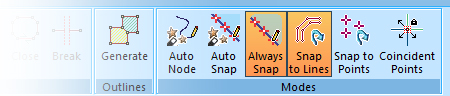
One way of doing this is to use data snapping. If using a mouse, right-clicking will snap to whichever data type(s) are configured. If using a tablet or finger, you can enable or disable snapping behaviour using the Always Snap or Auto Snap toggles, available on the Draw ribbon when digitizing specific map items such as features, comments, sketches or profiles, for example.
When digitizing on a map face (in either a map or world view), you can either snap to points, lines or both.
Snapping can be applied:
-
Always (Always Snap).
-
Only when close to other data (Auto Snap).
Note: There's no need to set up snapping modes when digitizing data (say, a polygon feature) onto a wireframe map. The closest wireframe vertex or point is snapped.
All snap settings can be used in combination with the following digitizing modes:
-
Auto Node digitizing mode.
-
Limit Snap to Face - this option ensures data can only be used to snap digitized points if it is on the current map face. All other data is ignored when snapping, regardless of any other mode set.
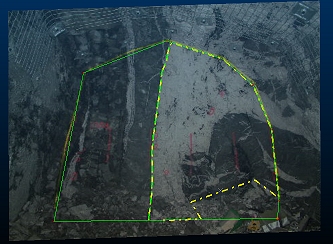
For example, in the image below, snapping will always be applied each time the stylus is tapped on the screen, and new string vertices will be snapped to the nearest string data. This could be useful when aligning contact surfaces of distinct geological structures, for example:
Subsequent digitizing ensures each point aligns with the nearest string edge or vertex on the map face, making it easy to align structures e.g.:
Notes:
- The Always Snap option can only be used in the presence of existing map point or string data. If enabled, and no suitable snap point can be found, data won't be digitized. Auto Snap, on the other hand, can be enabled even for an empty map as snapping won't be invoked until other data exists.
- You can't snap to the data item currently being digitized.
Related topics and activities